


Pumpkin nail art tutorial

Nothing says Halloween like a pumpkin. You know when they come out in the shops it’s time to get spooky. Whilst carving a pumpkin looks pretty fun, it can actually be pretty backbreaking work, especially if you’re trying to create a really intricate design. So if you want to skip the hard work this year but still want to get in the Halloween spirit, why not check out my Pumpkin nail art tutorial. This Pumpkin nail art tutorial is probably one of the simplest halloween nail tutorials you’ll find. The idea is to create a feature nail that draws people’s attention to your nails.
To create the look I used:

- White nail art pen
- Black nail art pen
- Orange nail varnish
Here’s how to recreate the Pumpkin nail art tutorial.
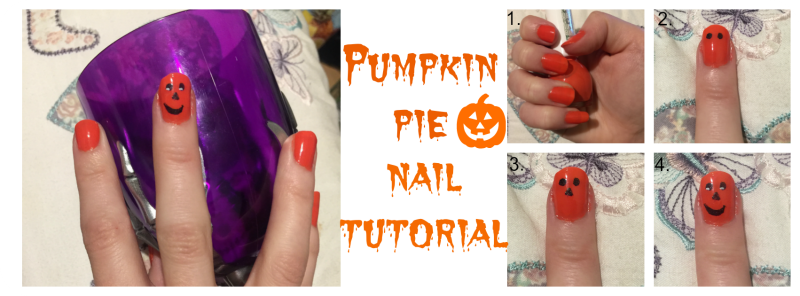
Step 1
Firstly paint all of your nails in a orange shade
Step 2
Pick a nail which will be your feature nail. I chose the middle nail as it’s the most central. Firstly draw two small dots for eyes.
Step 3
Using your nail art tool or pen draw a slight triangle shape for the nose
Step 4
Get your black nail art pen and draw a smile. Use a white nail art pen to draw small circles in the eyes. This will make the eyes stand out more.


I love this, been hunting for Halloween nail ideas and I like the simplicity!
Absolutely love the nails, so clever and cute .can you believe it’s almost time to start thinking about Halloween?!